- This event has passed.
Operation Steel Mirage
RSVP: 25 10 23 – 19:30 (please sign-up asap though, as it makes things easier to plan)
Activity: Mission – Strike, SEAD/DEAD, CAP, CSAR/Escort, CAS
Theatre: Syria
Modules: F/A-18C, F-16, AH-64, A-10C-II, OH-58D
Prerequisites: None
LINEUP
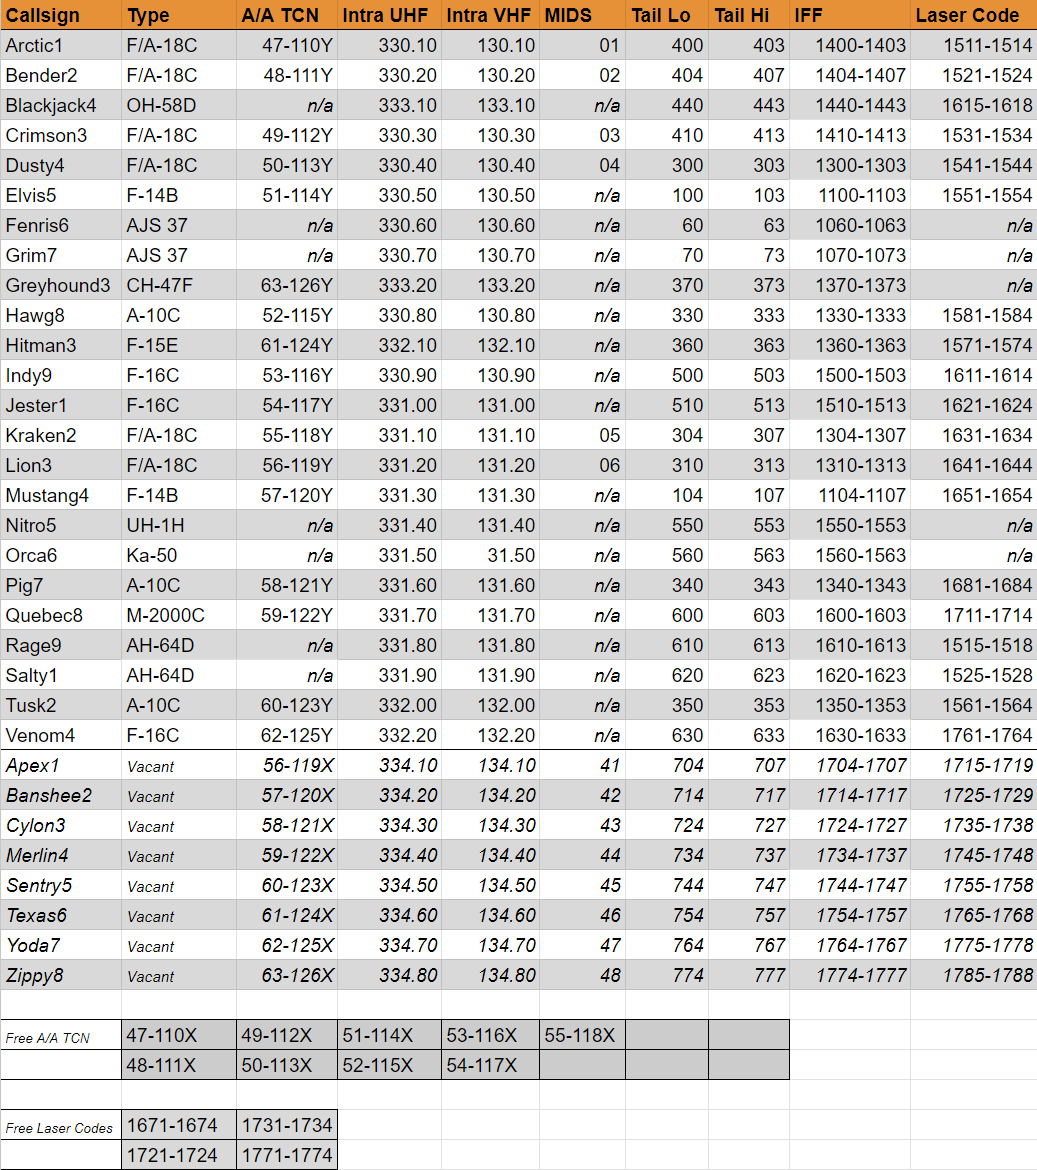
F/A-18C Strike ARCTIC11 (400): kaninmat ARCTIC12 (401): Makanan ARCTIC13 (402): Enska ARCTIC14 (403):
F/A-18C Strike BENDER21 (404): Moose BENDER22 (405): Bankler BENDER23 (406): Apollo BENDER24 (407):
F-16C SEAD INDY91: Moldy INDY92: undefined INDY93: Hofftari INDY94:
F-16C CAP JESTER11: Widen JESTER12: deadlift JESTER13: JESTER14:
CH-47F Transport GREYHOUND31: BFQ / Troll GREYHOUND32: GREYHOUND33: GREYHOUND34:
AH-64D Air Interdiction SALTY11: Tony / Jinx SALTY12: SALTY13: SALTY14:
OH-58D Reconnaissance BLACKJACK41: Kingtiger45 / Asken BLACKJACK42: Spaz / Puppysworth BLACKJACK43: BLACKJACK44:
A-10C Air Interdiction PIG71: DeadGun_SWE PIG72: Ulvar PIG73: PIG74:
AWACS STINGRAY: Blichten STINGRAY:
Airport Ground: Nikemo Tower: Control:
Carrier Marshal: Tower: LSO:
1 SITUATION
1.1 Overview
The situation in Syria has taken a turn for the worse in recent months. The Syrian Regime, bolstered by Russian military support, has been making rapid advances around Damascus.
U.S. intelligence failed to anticipate just how effective the Russian Maskirovka tactics can be, and now Syrian forces are pushing forward in a surprising pace, threatening the capital.
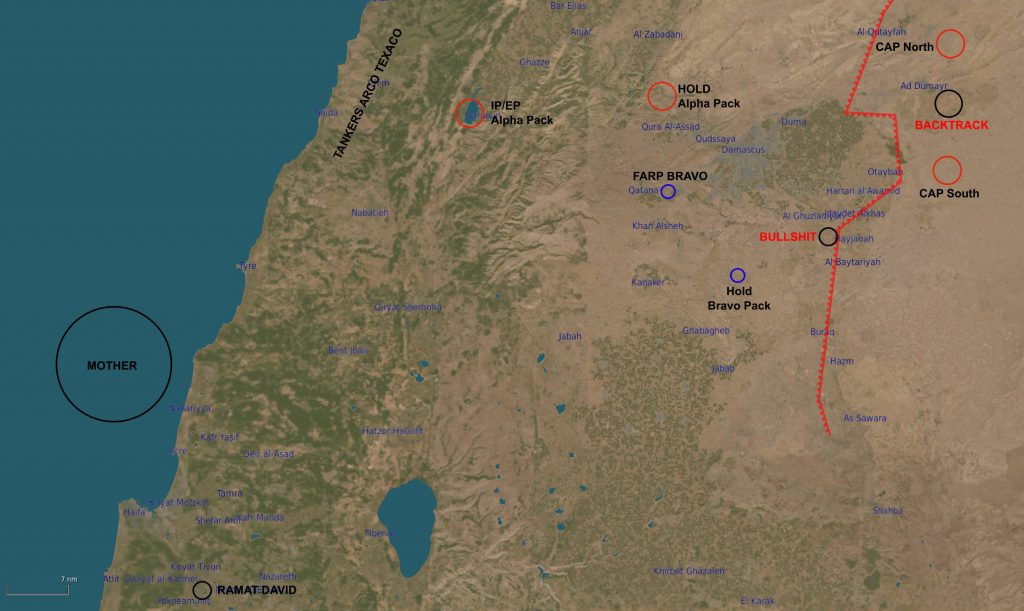
In the north, Al-Dumays airfield represents both as a logistic hub and potential staging ground for future airstrikes. Its neutralization is crucial to keeping the enemy at bay.
Meanwhile, in the south, the A-10 pilot’s capture could send a signal of vulnerability of American forces in the region. A successful recovery will show that U.S. forces are not only capable of striking hard, but also of retrieving their own when things get tough.
1.2 Area of operations
BACKTRACK (MGRS: BT): 23nm ENE of DAMASCUS. Next to mountain ridge. Al-Dumays airfield.
BULLSHIT (MGRS: BS): 14nm SE of DAMASCUS. Mostly desert with scattered villages.
1.3 Time and weather
* May 04 – 2016
* 05:45 local time
* Scattered (12000ft)
* Wind 337 / 6
* Temperature: 21℃
* FORCE QNH 2992 / 1013
1.4 Air threats
MiG-21, MiG-23, MiG-29
As for BACKTRACK, expect enemy reinforcements and scrambling air defense systems as soon as you hit their radar.
1.5 Ground threats
Technical, BMP-2, T-72B, ZSU-23 Shilka, SA-2, SA-6, SA-8
As you get closer to the front lines, expect enemy reinforcements, especially near BULLSHIT. The situation is fluid, and intel will likely shift as you go. Keep your eyes open and your weapons tighter.
1.6 Friendly forces
N/A, we are the only blue forces in the AO.
1.7 Civilian/3rd part
All civilian air traffic is suspended.
2 MISSION
There are two mission happening in parallel.
Mission Backtrack; neutralize the logistic hubs and shatter the run- and taxiways.
Mission Bullshit; provide cover for the rescue of the downed A-10 pilot.
3 EXECUTION
3.1 Commander’s intent
Neutralize the logistic hub and save our god damn pilot. Pigs don´t grow on trees you know!
3.2 Packages
The mission contains 2 packages, callsign ALPHA and BRAVO respectively.
Alpha: ARCTIC1, BENDER2, INDY9
Bravo: SALTY1 / BLACKJACK4, PIG7
3.3 Order of events
Mission Backtrack
This operation is divided into 2 phases which will be conducted chronologically: SEAD/DEAD and Strike on logistic targets/runways.
1. F-16 INDY9 will render SA-sites around Al-Dumays airfield inoperable. Report GOODNIGHT when succeeded to neutralize at least the SA-6 sites.
2. INDY9 will fallback to establish CAP track (WP4) to protect ARCTIC1 and BENDER2. Engage enemies at free will.
3. F/A-18 ARCTIC1 will, on GOODNIGHT, push and strike the logistic hubs.
4. F/A-18 BENDER2 will, on GOODNIGHT, push and strike the runways and taxiways.
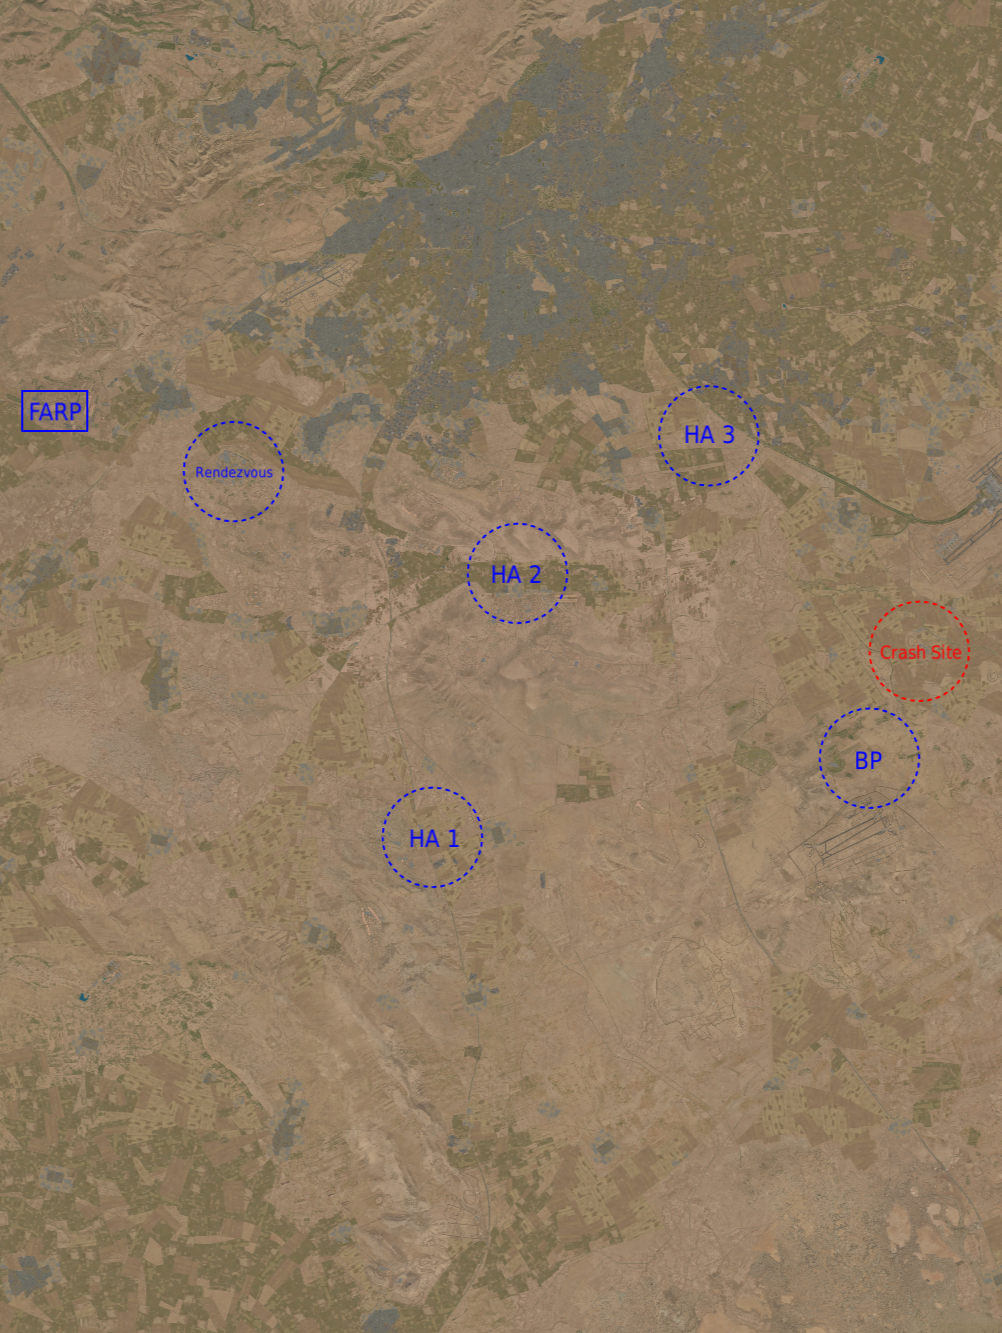
Mission Bullshit
This operation has one phase only.
1. Initially one flight infiltrates the crash site and locates enemy forces in the area. Three flights advance to holding area.
2. Then one flight attacks located targets at crash site supported by two flights.
3. One flight secures route back to FARP supported by one flight, One flight recovers downed pilot and withdraws back to FARP supported by one flight.
3.4 Rules of engagement
ROE: C
As per SPINS
Addition: Weapons free on all enemy SCUD installations unless they are moving into built up areas.
3.5 Acceptable level of risk
ALR: MEDIUM
As per SPINS
3.6 Flight tasking
Package ALPHA (Lead: ARCTIC11)
ARCTIC1
* Depart Mother
* Feet dry (WP1)
* FENCE IN (WP2)
* Hold until GOODNIGHT (WP3) at 20000′
* Initiate attack (FL assigns targets: WP4, 5, 6, 7, 8. See Annexes for details)
* FENCE OUT (WP9)
* Refuel if needed ARCO1
* Feet wet (WP10)
* Recover at Mother
Loadout: FL decides
BENDER2
* Depart Mother
* Feet dry (WP1)
* FENCE IN (WP2)
* Hold until GOODNIGHT (WP3) at 22000′
* Target Runway (WP4)
* Target Taxiway (WP5)
* FENCE OUT (WP6)
* Refuel if needed ARCO1
* Feet wet (WP7)
* Recover at Mother
Loadout: FL decides
INDY9/JESTER1
* Depart Ramat David
* Ingress Point: WP3
* CAP North: WP1
* CAP South: WP2
* Engage SA-6 and SA-2 sites (~WP4). SA-6 priority. Report GOODNIGHT
* Egress Point: WP5
* Refuel if needed TEXACO2
* RTB Ramat David
Loadout: FL decides (SEAD/DEAD & A2A)
Package BRAVO (Lead: PIG7)
PIG7
MOVE to HA 1
Be prepared to ATTACK targets located by Blackjack4
Be prepared to SECURE route back to FARP
Loadout: FL decides
BLACKJACK4
INFILTRATE crash site
LOCATE enemy units at crash site
Be prepared to ATTACK located targets supported by Pig7 and Salty1
Be prepared to SECURE route back to FARP supported by Pig7 or Salty1
Loadout: FL decides
SALTY1
ESCORT Greyhound3 to HA 1
MOVE to BP
Be prepared to ATTACK targets located by Blackjack4
Be prepared to ESCORT Greyhound3 to crash site
Be prepared to ESCORT Greyhound3 to FARP
Be prepared to SECURE route back to FARP
Loadout: FL decides
GREYHOUND3
MOVE to HA 1 escorted by Salty1
Be prepared to RECOVER pilot from crash site escorted by Salty1
Be prepared to WITHDRAW back to FARP escorted by Salty1
4 ADMINISTRATION AND LOGISTICS
4.1 Airfield operations
* Ramat David
* TCN: 84X
* Active runway: 33
* Departure via Exit Hayim
* Approach via Entry Amos Lake
4.2 Carrier operations
* CASE 1
* BRC: 018
* Departure time: ASAP
* Departure sequence: ARCTIC1, BENDER2
* Charlie time: 07:10
As per Carrier Ops SPINS
4.3 Tankers
As per Aerial Refueling SOP
5 COMMAND AND CONTROL
5.1 Commander
* Mission commander is STINGRAY
5.2 Frequencies
As per Comms SOP
5.3 Authentication
RAMROD: GRANDSLICE
As per Authentication SOP
5.4 Freq flow (Airfield flights)
7, 9, 3/5, 7
Remain on Tower (ch 7) during startup and departure. Go to Check in (ch 9). Expect Tactical (ch 3) or CAP A (ch 5). Use Tower (ch 7) for recovery.
5.5 Freq flow (Carrier flights)
1, 9, 3/5, 16, 1
Remain on Tower (ch 1) during startup and departure. Go to Check in (ch 9). Expect Tactical (ch 3) or CAP A (ch 5). Use Marshal (ch 16) and Tower (ch 1) for recovery.
5.6 Brevity
Mission Backtrack
* GOODNIGHT – SA-6 sites neutralized, push for ground strike
* NIGHTMARE – Failed to neutralize SA-6 sites
Mission Bullshit
* PIGGYBACK – Pilot retrieved (RTB)
* TIDY – Area of rescue clear of enemy activity. Rescue inbound.
* BACON – Pilot not retrieved (mission failed)
5.7 Bullseye
N 33 20.00′ E 35 46.00′
6 ANNEXES
Overview
BACKTRACK Target Area
Target 1 (WP4) – Building
Target 2 (WP5) – Long building (heading ~157/337)
Target 3 (WP6) – 4x Large fuel tanks (in a square-pattern)
Target 4 & 5 (WP7, 8) – Reinforced hangar
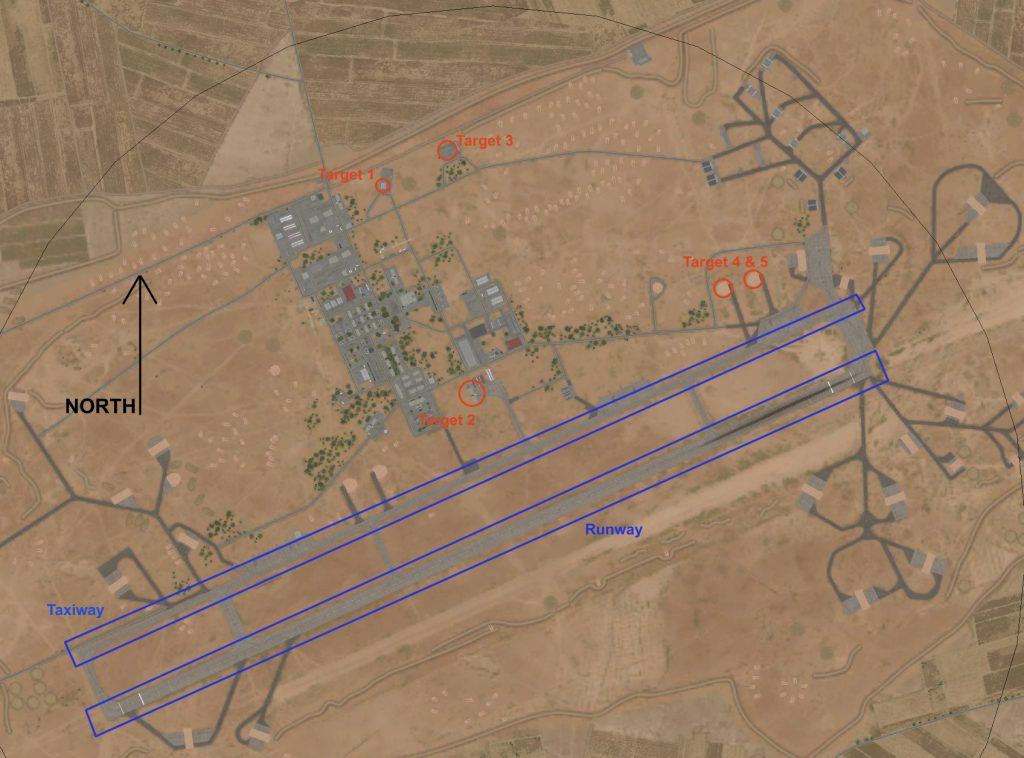
Image from vKontakte geolocated outside target 4.
BULLSHIT Overview